Python: Boruta による特徴量選択
UB3/informatics/python/boruta
このページの最終更新日: 2025/11/23広告
関連パッケージのインストール
Windows 11 でも試みたが、やはり Mac の方が簡単に実装できた。
まずは 文献 3 を参考に、とりあえず動くかどうか。このページが万が一消えたときのために、スクリーンショットも参考文献として保存しておく (文献 3)。
conda, pip などのインストールはターミナルで、スクリプトの実行は Spyder で。Spyder の設定 ページも参照のこと。
sklearn は、pip install scikit-learn というフルネームで実行。既にインストールされていれば、Requirement already satisfied というメッセージが出る。
boruta のインストールは、pip または conda で実行する。
pip install boruta
conda install -c conda-forge boruta_py
conda の場合のログ。
The following NEW packages will be INSTALLED:
boruta_py conda-forge/noarch::boruta_py-0.3-py_0
joblib conda-forge/noarch::joblib-1.2.0-pyhd8ed1ab_0
libblas conda-forge/osx-64::libblas-3.9.0-16_osx64_openblas
libcblas conda-forge/osx-64::libcblas-3.9.0-16_osx64_openblas
libgfortran conda-forge/osx-64::libgfortran-5.0.0-9_5_0_h97931a8_26
libgfortran5 conda-forge/osx-64::libgfortran5-11.3.0-h082f757_26
liblapack conda-forge/osx-64::liblapack-3.9.0-16_osx64_openblas
libopenblas conda-forge/osx-64::libopenblas-0.3.21-openmp_h429af6e_3
llvm-openmp conda-forge/osx-64::llvm-openmp-15.0.4-h61d9ccf_0
numpy conda-forge/osx-64::numpy-1.22.1-py39h9d9ce41_0
python_abi conda-forge/osx-64::python_abi-3.9-2_cp39
scikit-learn conda-forge/osx-64::scikit-learn-1.0.2-py39hd4eea88_0
scipy conda-forge/osx-64::scipy-1.8.0-py39h056f1c0_1
threadpoolctl conda-forge/noarch::threadpoolctl-3.1.0-pyh8a188c0_0
toolz conda-forge/noarch::toolz-0.12.0-pyhd8ed1ab_0
続いて以下。いくつかのパッケージは既にインストールされていたようだが、pandas, IPython などのパッケージが新規にインストールされた。
pip install IPython
以上をインストールし、Qiita のサイトにあるスクリプトを test.py として実行する (python3 test.py)。これで一応変数選択ができた。ただし、
を追加しないと display がみつからないというエラーになった。
230817 エラーログ
230817 に実行したところ、以下の 2 つのエラー。これは numpy のアップデートによるもので、1.24.0 から np.int や np.float が使えなくなったことによる。
numpy のバージョンを落とす方法もあるが、boruta_puy.py の np.int を int に、np.float を float にすべて変更することで解決。全部で 5, 6 箇所。np.bool も同様に処理したかもしれない。
|
AttributeError: module 'numpy' has no attribute 'int'. `np.int` was a deprecated alias for the builtin `int`. To avoid this error in existing code, use `int` by itself. Doing this will not modify any behavior and is safe. When replacing `np.int`, you may wish to use e.g. `np.int64` or `np.int32` to specify the precision. If you wish to review your current use, check the release note link for additional information. The aliases was originally deprecated in NumPy 1.20; for more details and guidance see the original release note at: https://numpy.org/devdocs/release/1.20.0-notes.html#deprecations |
|
AttributeError: module 'numpy' has no attribute 'float'. `np.float` was a deprecated alias for the builtin `float`. To avoid this error in existing code, use `float` by itself. Doing this will not modify any behavior and is safe. If you specifically wanted the numpy scalar type, use `np.float64` here. The aliases was originally deprecated in NumPy 1.20; for more details and guidance see the original release note at: https://numpy.org/devdocs/release/1.20.0-notes.html#deprecations |
広告
「あとがき」で当サイトを参考にしたと書いてくれているラノベです。Kindle Unlimited で読めました。ストーリーと文章が良く、面白かったです。
Boston housing prices を使った boruta
このスクリプトでは boston housing prices というデータセットを例に使っているのだが、これは倫理的な問題があり、いずれ取り除かれるらしい。これが正当なのか、行き過ぎたポリコレなのかわからないが、とりあえずは 2022 年 11 月現在、私の使っているバージョンではまだ使えるようなので、まずはこれで実行する。
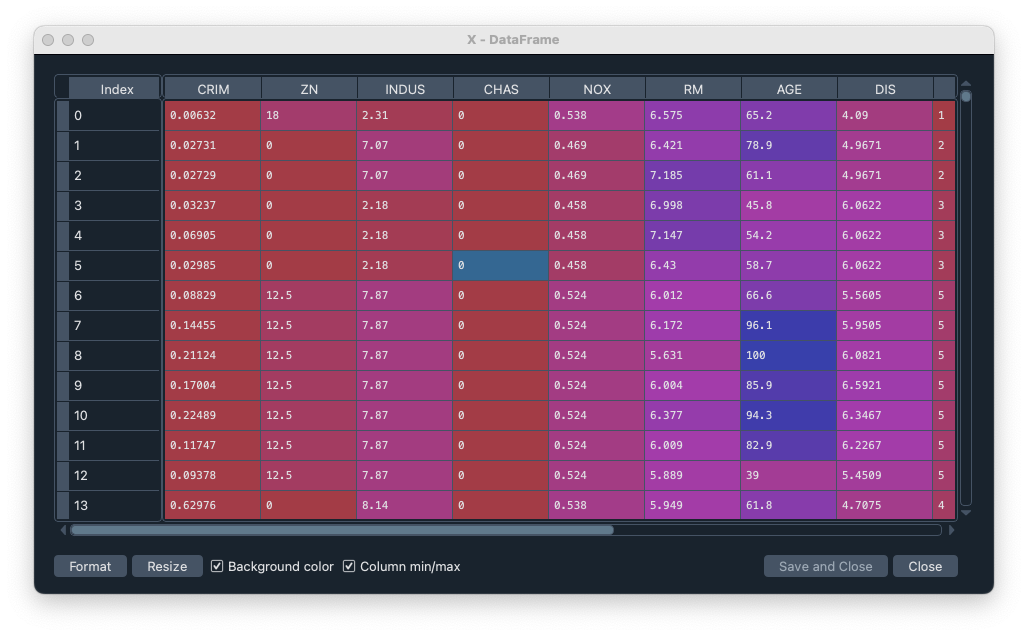
まず、データセットを呼び出してそれを Pandas DataFrame に格納する。
X = pd.DataFrame(boston.data, columns=boston.feature_names)
y = pd.Series(boston.target, name='target')
boston は Bunch object というものになり、Spyder でプレビューができない。X は 506 行 x 13 列のデータフレーム、Y は R のベクターに相当する 506 個の数値である。

とくに X は Boruta の説明変数になるので、自分のデータを解析するためにこの形を記録しておく。文献 2 に詳しい説明あり。

この X と y をそのままランダムフォレストに入れることもできるが、ここは Boruta のページなので、変数選択を行う。
Boruta を実行するためには、ランダムフォレストの関数を使う必要があるようである。まず RandomForestRegressor の関数を作り、これを BorutaPy に入れ、それで X と y を fit している。
Boruta.Py 関数のオプションを表にしておく。
| n_estimators | 'auto' の場合は、データセットのサイズから自動で決められる。数で設定することもでき、デフォルトは 1000 である。 |
verbose |
アウトプットの冗長性 verbosity を設定する。 |
random_state |
|
two_step |
True または False、デフォルトは True。Bonferroni correction のオリジナル版を使いたいときのみ False とする。 |
max_iter |
Iteration の最大回数。デフォルトは 100。 |
perc |
パーセンタイル。これを変更すると、選択される変数の数が変わる。文献 6 に以下の説明がある。 Boruta cannot determine the specific number of selected variables. The p-percentile in the Boruta algorithm controls the number of selected variables, and the smaller the p, the larger is the number of selected variables. In general, p = 100 in Boruta. That is, the maximum variable importance of the shuffled X is used as the standard, but the smaller the number of samples, the greater is the likelihood of the shuffled X being correlated with y accidently. Hence, when the sample size is small, there is a risk of deleting too much X. Therefore, in this study, after a large number of X was generated based on random numbers that follow the standard normal distribution, the correlation coefficients between random X and y were calculated, and 100-fold of their maximum absolute values were regarded as p. If p in this method is set with a consideration of chance correlation, the over-deletion of X when the sample size is particularly small can be prevented. This approach is called r-Boruta. |
California housing prices を使った boruta
練習がてら、推奨されているデータセットにスイッチしてみる。
広告
References
- Scikit-learnの使い方を徹底解説!AIエンジニアにおすすめ. Link: Last access 2022/11/18.
- 未来の数値を予測する!?AIの回帰分析を徹底解説! Link: Last access 2022/11/25.
- Qiita Borutaで特徴量を選択する. Link: Last access 2022/11/26. スクリプトスクショへのリンク.
- Borutaによる変数選択. Link: Last access 2022/12/04.
- Boruta Documentation. Link: Last access 2022/12/06.
Kaneko, 2021a. Examining variable selection methods for the predictive performance of regression models and the proportion of selected variables and selected random variables. Heliyon 7, e07356.- ランダムフォレストと検定を用いた特徴量選択手法 Boruta. Link: Last access 2022/12/15.
コメント欄
サーバー移転のため、コメント欄は一時閉鎖中です。サイドバーから「管理人への質問」へどうぞ。
